How to build personas
TL;DR
Summary
A persona is a fictional but realistic user profile, built from research data, that synthesizes the behaviors, goals, and frustrations of a group of users. It serves as a shared reference for the whole team to make user-centered decisions.
Goals
Turn research data into actionable profiles that guide design, align teams around a shared understanding of users, and avoid the trap of “designing for everyone.”
What is a persona?
A persona is a fictional archetype of a group of users, based on real research data, describing their goals, behaviors, frustrations, and context of use.
The concept was popularized by Alan Cooper in 1998 in his book The Inmates Are Running the Asylum. Cooper, a developer and interface designer, was seeing a recurring problem: development teams were designing software for abstract users, sometimes even for themselves. The persona was his answer to that problem. By giving a name, a face, and a story to the typical user, he pushed the whole team to ask: “Would Sarah use this feature? Does this answer her need?”
The strength of the persona is that it makes the abstract concrete. Instead of talking about “the user,” you talk about “Sophie, 34, marketing manager at a mid-sized company, juggling 5 tools every day and looking above all to save time.” That’s no longer an abstraction. It’s a person you can picture, whose constraints you understand.
What matters is to build personas that reflect behaviors observed in the field, not the project team’s projections.
The different types of personas
There are several approaches. It’s worth distinguishing them because they don’t carry the same value or the same use.
The UX persona (research-based)
This is the persona as Cooper defined it. It’s built from data coming from exploratory interviews, field observations, user tests, or data analysis. Every element of the persona is traceable: you can trace it back to the verbatim quotes and observations that led to a given trait.
This is the type of persona I’d recommend you build. It takes work upfront, but it has real value: it’s defendable, sourced, and usable in workshops.
The marketing persona
The marketing persona leans more toward commercial segmentation. It focuses on demographic data, consumption habits, preferred communication channels, and purchasing power. It’s useful for ad targeting but insufficient for designing a product or service, because it doesn’t describe usage behaviors or frustrations.
The proto-persona (or hypothesis persona)
The proto-persona is built without user research, purely on the basis of the team’s hypotheses. It’s a useful exercise at the start of a project to align the team on its view of the users and to surface zones of uncertainty. But beware: a proto-persona is not a persona. It’s a starting point that absolutely must be tested against the reality of the field.
I’d suggest building a proto-persona in 30 minutes with your team, then planning interviews to validate or invalidate it. The danger of the proto-persona is that it can morph into “truth” if no one ever goes to verify in the field.
Building personas: a step-by-step method
Prerequisite: have material
Before you start, you need to have research data. Ideally:
- Between 6 and 12 exploratory interviews with real or potential users
- Field observation notes if you have any
- Quantitative data (analytics, surveys, CRM data) as a complement
If you haven’t run interviews yet, I’d encourage you to read the article on exploratory interviews before continuing. Building personas without research is building on sand.
Step 1: Gather and organize the data (45 minutes)
- Pull all of your interview notes together.
- List, for each interviewed participant: their context, main goals, frustrations, habits, tools, and standout verbatim quotes.
- Organize this material in a spreadsheet or in Notion, with one row per participant and one column per type of information.
Step 2: Identify the patterns (1 hour)
This is the crucial step. The aim is to spot behaviors that repeat from one participant to another.
- Reread your data looking for shared points. Which goals come back? Which frustrations repeat? Which behaviors look similar?
- Start grouping participants who resemble each other. You’re looking for groups of people who share the same goals and the same behaviors around your topic.
- Name those groups provisionally. For example: “The rushed ones,” “The methodical ones,” “The beginners.”
Important: groups must form on the basis of behaviors and goals, not demographic data. Two people, 25 and 55, can belong to the same group if they share the same goals and frustrations. Conversely, two people of the same age and same job can have radically different behaviors.
My advice: aim for 2 to 4 personas. Beyond that, you risk losing clarity. A persona that doesn’t help you make a decision is a useless persona.
Step 3: Prioritize the personas (30 minutes)
Not all personas carry equal weight. Identify:
- The primary persona: the one you design for first. Their needs come first when there’s a conflict.
- The secondary personas: those whose needs are important but who don’t drive design choices when there’s a dilemma.
- The negative personas (or anti-personas): those you do NOT design for. Naming them explicitly helps you avoid spreading yourself thin.
This prioritization is essential. If everyone is a priority, no one is. By naming a primary persona, you give the team a clear decision criterion.
Step 4: Write the persona profiles (45 minutes per persona)
For each persona, build a profile containing the following elements.
The essential fields:
- First name and last name: pick a credible, memorable first name. Some teams use a first name starting with the same letter as the persona’s distinctive trait (“Sophie the Strategist”). It’s a handy memory aid.
- Photo: use a realistic photo (not a cartoon avatar). Stock libraries like Unsplash offer royalty-free portraits. The photo makes the persona tangible.
- Key quote: a single sentence that captures the persona’s attitude, taken straight from your interviews. For example: “I don’t have time to search, it has to work the first time.”
- Context: a paragraph describing the persona’s situation. Who are they? What does their day-to-day professional or personal life look like in relation to your topic? How does the persona behave around your topic? What tools do they use? What workarounds have they built?
- Goals: what the persona is trying to accomplish. Word them concretely. “Save time on admin tasks” is better than “Be more efficient.”
- Pain points (frustrations): what blocks the persona, what bothers them, what they put up with. Use verbatim quotes from your interviews to stay close to the field.
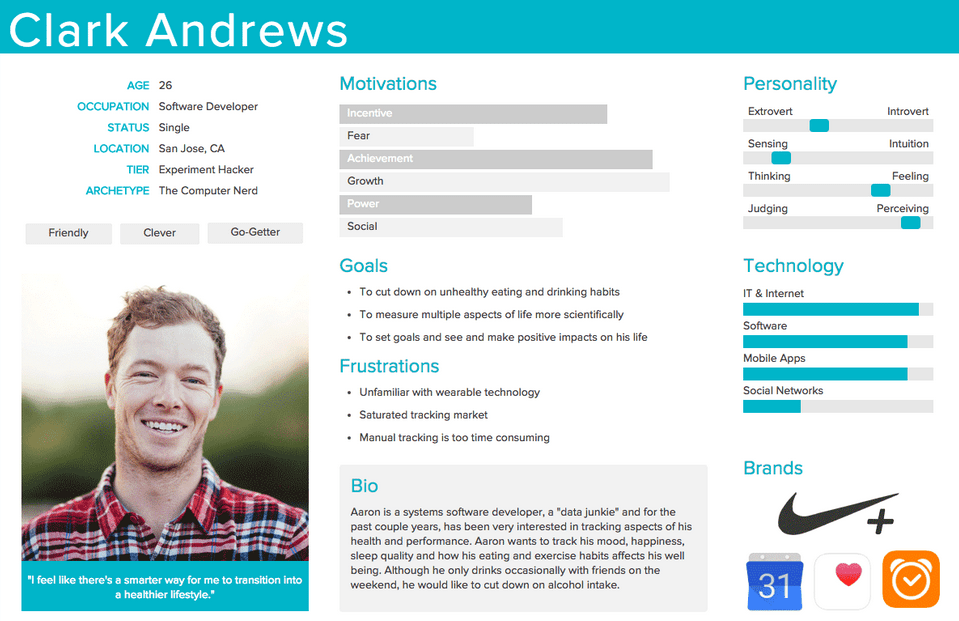
Example persona profile with the key information: photo, context, goals, and frustrations.
The optional fields:
- Digital literacy: on a simple scale (novice, intermediate, expert)
- Preferred channels: email, phone, chat, in person
- Reference brands or tools: what the persona is already using
- Demographic data: age, job, location, family situation. Keep it minimal. This data is there to add context, not to segment.
(Optional, going further) Step 5: Connect the needs to the Kano model (30 minutes)
The Kano model, developed by Noriaki Kano in 1984, distinguishes three categories of needs. I find this lens particularly useful to enrich your personas and prioritize features.
- Must-be needs (basic needs): what the persona takes for granted. They don’t mention it when it’s there, but they’re very unhappy when it’s missing. Example: “the site has to work on mobile.”
- Performance needs (one-dimensional): the more you address them, the more satisfied the persona is. Example: “search must be fast” — and the faster it is, the better.
- Attractive / Excitement needs: what the persona doesn’t expect but is delighted by when it’s there. Example: personalized suggestions based on their history.
For each persona, identify 2 or 3 needs in each category. That gives you a powerful prioritization grid: first make sure the must-be needs are covered, then work on the performance needs, and keep the attractive needs to differentiate.
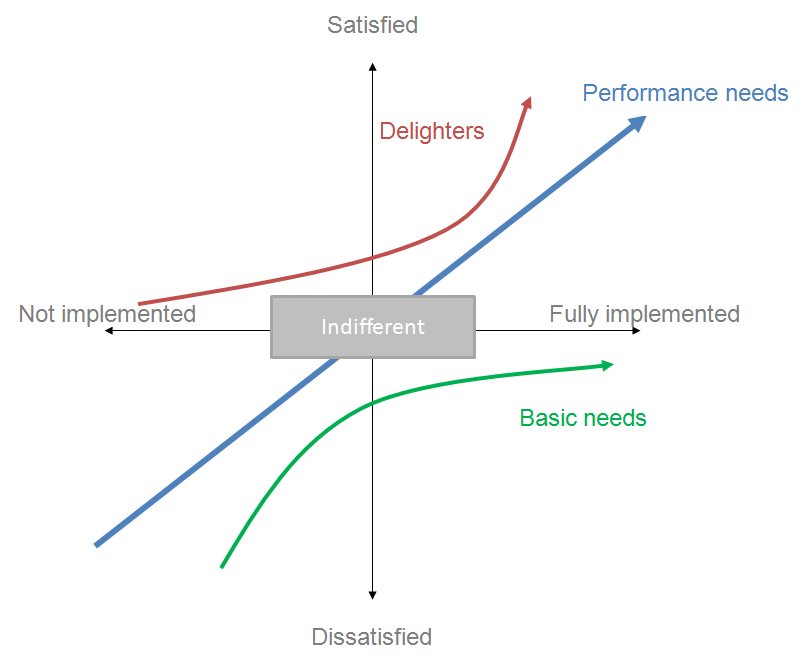
The Kano model: user satisfaction depends on the type of need being addressed. Credit: Craigwbrown, CC BY-SA 3.0, via Wikimedia Commons.
Step 6: Validate and share (30 minutes)
- Present your personas to the project team and stakeholders. Ask them: “Do you recognize people in these profiles?”
- If anyone on the team is in direct contact with users (customer support, sales), their validation is precious.
- Display the personas in the team’s workspace. A persona that stays inside a slide deck or a Notion page has no impact. It needs to be visible day to day.
By the end of this method, you should have:
- 2 to 4 sourced persona profiles, with a clearly identified primary persona
- A clear hierarchy between the personas
- Personas displayed and shared with the team
Using personas in workshops
Personas reach their full value when they’re used as collective working tools. Here are a few formats I’ve found particularly effective.
The “persona check” in design reviews
At every design review or prototype review, lay out the persona profiles on the table (or share them on screen). Before validating a decision, ask: “Does this work for our primary persona?” This simple 2-minute ritual per decision improves the quality of trade-offs.
The persona as a backlog prioritization criterion
In your prioritization sessions, add a “Primary persona affected” column to your backlog. That helps you check that you aren’t neglecting your priority audience in favor of internal requests or edge cases. If 80% of your tickets concern the secondary persona, there’s a prioritization problem.
The persona as a recruitment tool for tests
Your personas directly give you the recruitment criteria for your user tests. The goals, frustrations, and behaviors described in the persona profile turn into screening questions for your recruitment form. For example, if your primary persona is described as “using 5 different tools every day,” ask: “How many tools do you use daily in your work?”
Anti-patterns: what NOT to do
Inventing personas without research
This is the most common and the most damaging mistake. An invented persona is worse than no persona at all, because it gives the illusion of knowing the user. I’ve seen teams design for months on the basis of personas invented in a meeting room, only to discover at the first user test that their assumptions were wrong.
If you don’t have time to do research, build a proto-persona but label it clearly as such. And plan interviews to validate it.
Creating too many personas
Five, six, seven personas. I’ve seen projects with 8 personas. It’s unworkable. When there are too many personas, no one remembers them and no one uses them. Each added persona dilutes attention. Aim for 2 to 4 personas, no more.
Confusing a persona with a demographic segment
“Woman, 30-40, urban, upper-middle income” is not a persona. It’s a marketing segment. A persona is defined by behaviors, goals, and frustrations. Two 35-year-old women living in the same city can have radically different behaviors with your product.
Building personas and never using them
The persona is a decision-making tool, not a documentation deliverable. If no one ever says “What would Sophie think?” in a design meeting, your personas are useless. Bake them into your rituals: design reviews, backlog prioritization, user story writing.
Setting personas in stone
Users evolve. Your knowledge of them does too. Plan to update your personas after every significant research wave. A persona that’s 2 years old and has never been revisited is probably outdated. It’s hard to do over the long term, but it pays off.
Recommended template
I’d suggest creating your personas in a collaborative tool accessible to the whole team. FigJam, Notion, a Google Slides — pick what works for you. It needs to be visual.
Here’s the structure I recommend for a persona profile in A4 landscape format:
- Top left: photo + first name + role/job + key quote
- Bottom left: context paragraph
- Top right: goals (3 to 5 bullet points)
- Bottom right: frustrations (3 to 5 bullet points with verbatim quotes)
Keep the profile on a single page. If you need more room, you’re putting in too much detail. The persona should be readable in 2 minutes.
When to use personas?
Personas are useful throughout the design cycle, but they’re especially useful in the framing phases. That’s where they’re most valuable for scoping the research to do and the hypotheses to test. Here’s how to use them at the different stages of a project:
- In the framing phase (before interviews / research): to get the stakeholders talking so they can voice what they have in mind, which helps you decide who to go and meet.
- In the exploration phase: to synthesize research findings and align the team.
- In the ideation phase: to evaluate ideas. “Does this concept answer Sophie’s goals?”
- In the design phase: to make interface decisions. “Sophie is in a rush. This 5-step flow is too long for her.”
- In the testing phase: to recruit the right participants. The criteria from your personas directly give you the recruitment criteria for your user tests.
- In the prioritization phase: to arbitrate features. “This feature addresses a need from the secondary persona. Let’s do it after the one that addresses the primary persona’s need.”
Going further
- Exploratory interviews: the research method that feeds your personas.
- The experience map: to chart the emotional journey of your personas.
- User testing: to validate your design hypotheses with real users.
- The ideation workshop: personas feed the problem framing upstream of ideation.
Sources
- Cooper, Alan. The Inmates Are Running the Asylum. Sams Publishing, 1998.
- Kano, Noriaki et al. “Attractive Quality and Must-Be Quality.” Journal of the Japanese Society for Quality Control, 1984.
- Personas: Study Guide (Nielsen Norman Group): https://www.nngroup.com/articles/personas-study-guide/
Want to go further?
I offer individual coaching to dig deeper and apply these topics to your context.
Book a session