How to run an ideation workshop
What is an ideation workshop?
An ideation workshop is a one-day session to create an innovative concept around a given problem statement. It usually fits within a Design Thinking approach.
The goal is to tap into the crowd to generate ideas and derive a desirable, economically viable, and technically feasible concept. These days are usually fun and especially effective when well facilitated. They align all the stakeholders and surface concepts that are sometimes oddball but often relevant.
This workshop is generally preceded by user research, in particular through experience maps. I recommend always following it with a story mapping workshop to keep the relevant ideas and clear out the off-topic ones.
Context for the ideation workshop
Detailed program (6h)
The ideation workshop comes right after the exploration phase. It runs for one day, brings together varied profiles, and kicks off momentum around an innovative concept.
- 1h: Walkthrough
- Benchmark results for this market
- Experience map
- 30 min: Problem framing
- 1h30: Divergence phase
- 2h: Convergence phase
- 1h: Pitch and wrap-up
Group composition
- facilitator(s): to manage time and the workshop’s progress. Usually does not participate in the activities but plays a challenger role.
- designer(s): important to make concrete solutions emerge.
- workshop members: from marketing, tech, sales, HR, leadership, management, business, they take part in the thinking and design.
Number of people
- Minimum 5 people excluding the facilitator (1 problem statement covered)
- Maximum no limit (with enough facilitators)
- Plan for sub-groups of between 4 and 7 people
Walkthrough (1h)
The first step of the ideation day is the workshop walkthrough. It’s a very classic phase where you introduce the day and present the program.
Then comes the benchmark presentation. Running a benchmark of existing solutions on the user research topic ahead of the workshop helps everyone gauge the state of the market. The goal is to briefly present the solutions, who they target, and the problems they try to solve.
Finally comes the experience map walkthrough. To present them effectively, I recommend printing them at A1 or A0 size and posting them on the wall. The point is to walk through the journey step by step, describing the emotional curve and the verbatim quotes at each step. Going into detail is important so that every participant has a solid understanding of what happened in the field.
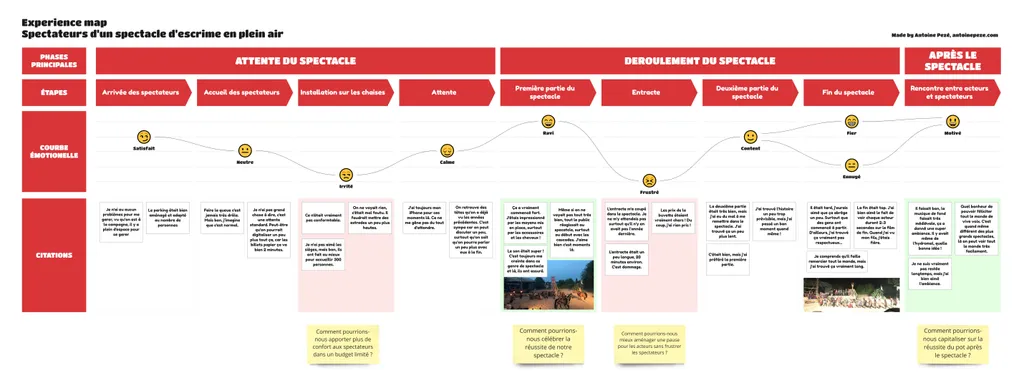
Problem framing (30 min)
Problem framing means building a problem statement based on the extreme emotions identified in the experience maps. You write a statement starting with “How might we”.
- Spot every especially good or bad emotion in the journey and circle it.
- Ask participants to write the problem statement for each identified emotion on a landscape A4 sheet. They write the statements in small groups. We start each one with “How might we”. Example: “How might we surface the existing training programs?”
- Post the statements on the wall, near the relevant experience maps (below or beside them).
- Give each participant 2 votes and explain: “Pick the 2 problems that seem most important to address.” Participants vote by drawing one mark with a marker on the sheets they choose.
- Pick the 2 or 3 problems that received the most votes, depending on the number of participants.
- Split the groups across the problems to address.
Divergence phase (1h30)
Goal: create options to address the problem. We also say the goal is to come up for air, to step out of daily routine. These phases aim to generate many ideas, often offbeat ones, without commenting on them.
The point of this phase is to multiply divergence activities to feed the thinking.
A. Brainstorm
- Give each participant a stack of sticky notes and a marker.
- Write the problem chosen for the group on the wall and explain the rules: “You have 3 minutes to come up with as many ideas as possible to address this problem. One idea per sticky note, write in capital letters. At the end of the 3 minutes, I’ll collect every sticky note and post them on the wall without organizing or commenting on them. Any questions?”
- Start the timer and call out the time remaining at 1 min 30 and 30 seconds.
- Collect every sticky note and post them on the wall. Don’t order them or create categories, aim for a big word cloud. Don’t comment on the posted notes. The only exception is when a note isn’t self-explanatory. Then ask: “Can the person who wrote this note clarify?”
- (Once every note is posted) Propose a second brainstorm question derived from the first one. The goal is to anchor on one element of that first problem and shift part of it. Examples of alternatives:
- “We’re now at Apple (unlimited funds, everything is technologized), how might we surface the existing training programs?”
- “How might we surface the existing training programs with 20 euros?”
- “How might we surface the future training programs?”
- “How might we surface testimonials of training programs?”
- “How might we receive information about the existing training programs?”
- Run the brainstorm 2 to 3 more times with the alternatives. You can come up with your alternatives while you watch the timing of the previous brainstorms.

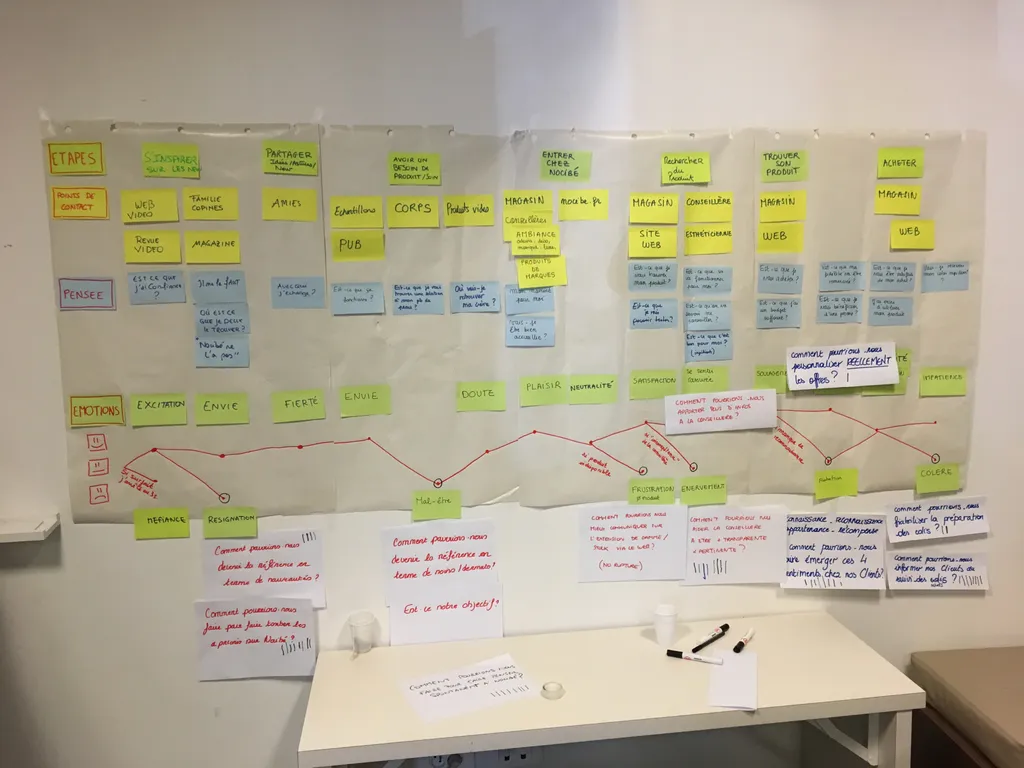
An example of a wall of sticky notes from a brainstorm
B. Brainwriting
- Give each participant a stack of sticky notes and a marker.
- Write the problem chosen for the group on the wall and explain the rules: “You have 2 minutes to write 2 ideas that address this problem. One idea per sticky note, write in capital letters. At the end of the 2 minutes, you’ll pass your 2 sticky notes to the person on your left.”
- Start the timer and call out the time remaining at 1 minute and 15 seconds.
- Explain the next instructions: “You have 2 minutes to build on the 2 ideas you just received. Stick a sticky note next to the ones you just got. Keep the problem in mind. Some ideas may be wild, that’s fine, try to bounce off them.”
- Start the timer and call out the time remaining at 1 minute and 15 seconds.
- Repeat steps 4 and 5 two more times. You should end up with 4 sticky notes posted next to each other.
- Stick the sets of sticky notes on the wall and give some time to take in the results.
C. Idea association
- (Once the brainstorm sticky notes are posted on the wall) Ask 3 participants to each grab their favorite sticky note without revealing it to the others.
- (Once back at their group) Ask the 3 participants to reveal their notes by sticking them in the middle of the table and explain the brief: “You have 6 minutes to sketch a solution that addresses the problem by combining the 3 ideas in the center. By the end of the 6 minutes, you should have sketched your solution on an A4 sheet.”
- Repeat the process a second time with 3 other notes.
Note: the point is to practice idea association. The result doesn’t matter much and may be absurd, that’s fine.
Convergence phase (2h)
Goal: make choices to address the problem. The point of this step is to find solutions that are viable in the given context.
The point of this phase is to run several convergence activities to refine the idea.
A. Map (45 min)
The map (also called process map) is a tool that helps understand the final goal of the idea, the actors it involves, and the steps of the journey.
It has 3 main parts:
- The list of actors on the left
- The end goal on the right
- All the intermediate steps in the middle
Here’s how I’d suggest building this map:
- Write the goal of the solution in the right-hand box.
- Identify all the actors involved and write them in the left-hand boxes.
- Describe each actor’s journey one by one by drawing the steps that lead to the goal.
- Group the steps that are shared between actors.
- Add arrows between each step.
- Name the concept you’ve created and write its name at the top.
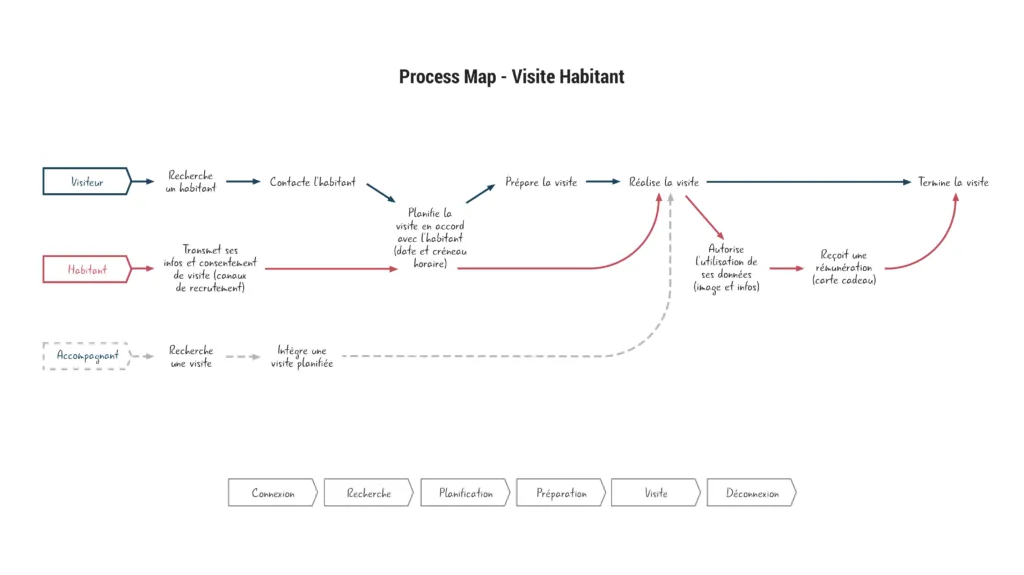
Example of a map
B. Prototyping the solution (1h15)
- Pick the part of the process map to prototype.
- Prototype a solution using the materials available to the group (paper, markers, modeling clay, LEGO, sticky notes, etc.).
- Photograph or film the result and put it in a slide with a short explanation.
C. Pitch prep (1h15, in parallel with prototyping)
- Learn more about preparing your pitch
Pitch and wrap-up (1h)
This final phase of the day is for presenting the different solution pitches. Groups organize themselves to deliver a 2 min 30 max presentation.
There are then exchange moments after each solution, which sparks discussion.
Finally, the day’s debrief takes place.

What to do after this workshop?
I recommend always following this workshop with a story mapping workshop to keep the relevant ideas and clear out the off-topic ones. It’s sometimes hard to walk away with directly actionable material from this kind of workshop. In my view, it’s critical that the project team owns the ideas from the group and shapes them into a coherent solution.
So always plan for at least 2 workshops when you want to do ideation:
- at least one ideation workshop with a broader, relevant group (multiple workshops are obviously an option for more richness)
- a workshop reserved for the project team so they can position themselves relative to the ideas from the group ideation
Going further
- The experience map: the tool that feeds the workshop’s problem statement
- The story mapping workshop: to structure the concept that came out of ideation
- The pitch: to present the solutions you’ve imagined
Want to go further?
I offer individual coaching to dig deeper and apply these topics to your context.
Book a session