How to run a sketching workshop
TL;DR
Summary
Half a day to get a group drawing, even people who may have never drawn before.
Goal
Understand the group’s ideas and how they’re pictured in the minds of the people involved.
Going deeper
General program (3h)
The sketching workshop is useful for prioritizing and getting a group of users on board with the project.
30 min: Project walkthrough
30 min: Sticky-note activity
1h30: Sketching
45 min: Debrief
Group composition
- facilitator(s): to manage time and the workshop’s progress. Usually does not participate in the activities but plays a challenger role on the drawings.
- workshop members: business folks plus users.
Number of people
- From 3 to 20 participants (excluding facilitators)
Preparation
- Markers (one per participant)
- Tape
- Sticky notes
- Round stickers
- Blank A4 sheets
- A4 sheets with grids to print (thanks to sneakpeekit.com)
- sneakpeekit-2-mobiles-grid.pdf
Project walkthrough (30 min)
The first step of the day is the workshop walkthrough. It’s a very classic phase where you introduce the day and present the project.
This phase will set up the second step, prioritization with sticky notes. The goal is to share as much context as possible so participants can prioritize with full information.
Sticky-note activity (30 min)
Phase 1: writing ideas
The goal is to ask participants about the pages to create. A question like “What are all the pages of the tool we should sketch?” surfaces a lot of material.
It reveals how participants see the world around them, and in our example, the software around them.
The facilitator gives participants 3 minutes to come up with ideas and asks them to keep their sticky notes with them.
Phase 2: grouping
This phase starts with sticking the notes on the wall. I recommend the facilitator collect every note and read it as they post it on the wall.
This way, they can already start to group together notes with the exact same idea by stacking them on top of each other. If it takes more than 3 seconds of thinking to decide where to stick a note, just stick it in an empty area.
Once the ideas are shared, the facilitator’s job is to quickly group the notes. To keep participants busy in the meantime, here’s a tip I’d suggest: tell participants “Everyone stand up and take 2 min 30 to share what you’ve learned so far.” That gives the facilitator time to group at their own pace without making the group wait, since they’re chatting among themselves.
The approach is to group every note on the same theme into a “blob” and find a title for each blob. If the facilitator has doubts about which category a note belongs in, they leave it aside. Once grouping is done, you have several groups of notes each with a title, plus a few notes off to the side.
The facilitator presents the grouping to the group and asks them what to do with the leftover notes.
Phase 3: vote
The facilitator gives this brief: “You have 3 votes to pick the most important groups. Make a mark directly on the relevant note.”
Once the votes are in, the facilitator pulls out the ideas with the most votes. Those will be the themes the groups have to sketch.
Sketching (1h30)
Phase 1: making people comfortable with drawing (5 min)
The goal of this phase is to reassure participants by showing them that drawing an interface isn’t complicated.
My trick: I draw a page live on a flip chart while explaining that I’m only adding lines and shapes.
Make clear that it’s important to add notes on the interfaces to explain the role of a button or a part of the interface.
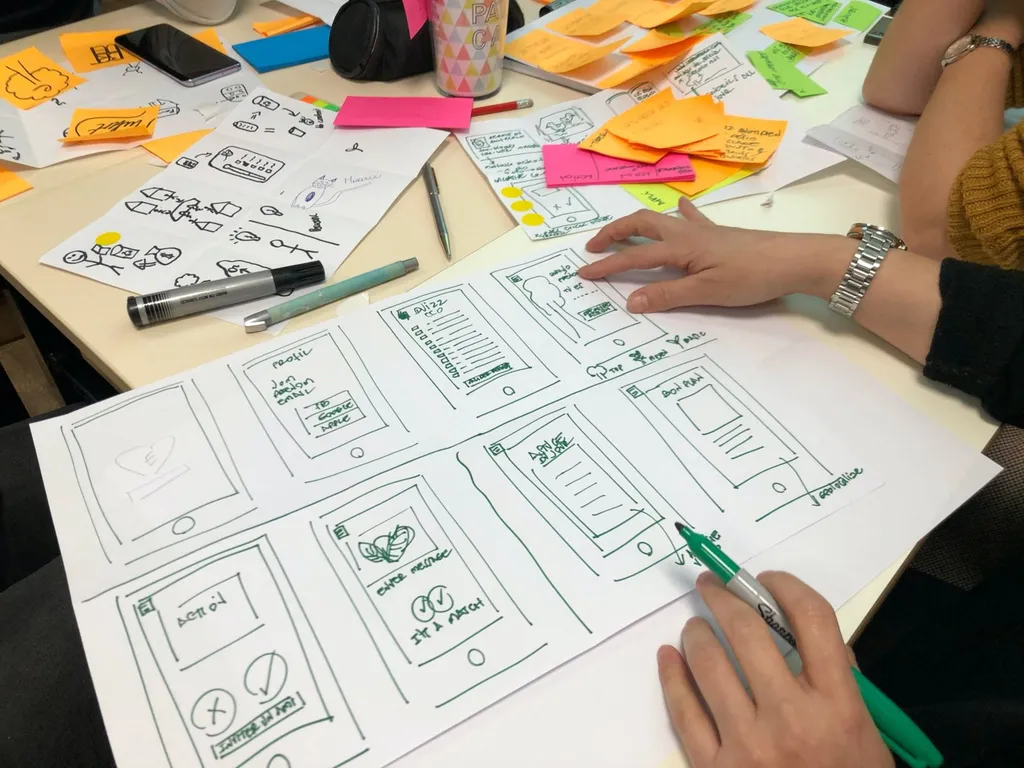
Phase 2: drawing (1h)
Ask each group to draw the interfaces tied to the themes they prioritized earlier. A few rules:
- one page per screen
- a single format (landscape or portrait)
- don’t try to be too precise
The facilitator should regularly come and challenge the groups to ask them to add notes, or question them on a particular element.
Phase 3: store the drawings (5 min)
Ask participants to store their drawings using apps like CamScanner (for Android) or Scannable (for iOS). These apps save an image but, more importantly, make it cleaner and sharper, and crop it.
Each group should email the photos to the facilitator.
Phase 4: post the drawings on the wall (5 min)
Ask the groups to post their drawings on the wall.
Tip: it’s sometimes useful to add arrows to show an order or a specific flow. Use sticky notes with arrows on them for that.
Debrief (30 min)
Phase 1: presenting the results
Each group presents its results. The group answers questions or comments while presenting.
Phase 2: highlighting the good ideas
Give each participant 5 small round stickers and the brief: “Stick your stickers on the elements that seem especially relevant.”
Phase 3: debrief and conclusion
The facilitator summarizes the elements that received the most stickers and gets the group talking about the choices that were made. That helps them understand why a given element was picked.
Sometimes you have to look beyond the drawn element to understand the idea behind it. For example, if a large, centered title got many stickers, it means that title needs to be highlighted, but not necessarily exactly as it was drawn.
Finally, make clear that all this material will guide future design and won’t be reused as-is. Designers need to bring overall coherence and meaning to the design.
Going further
- The Design Sprint: uses sketching in its design phase
- The ideation workshop: to generate ideas before sketching
- User testing: to validate the prototypes from sketching
Want to go further?
I offer individual coaching to dig deeper and apply these topics to your context.
Book a session